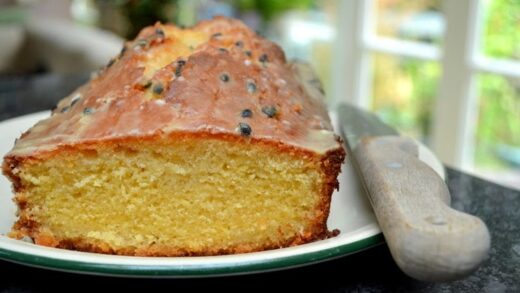
A Decadent Confection
When my husband and I visited beautiful Vancouver a few years ago- we missed
learning about a Nanaimo Bar!

ERR—A confection famous in British Columbia- not a social destination! 😊
Once you taste one–you need at least one more-so rich and accompanied by hot tea or coffee-a perfect way to start your day-

pumping up chocolate induced endorphins or whatever is supposed to happen (in an effective way) when you eat dark chocolate!
(Of course, eat a nutritious breakfast first!) I learned about these delicacies from an article in the Daily Bruin, a magazine from UCLA that my husband brought home.
The article was written by Isabella Ray, I am guessing a relocated student, who shared that the three-layer bars –comfort food from her childhood-originated in Nanaimo, British Columbia, on Vancouver Island.
For me, the fact that there is no baking involved proved intriguing so I had to prepare them.
I was also motivated to make these bars to serve to the current CTE Cake Decoration students- and they were an immediate hit—several students took home extras- and no wonder as the combination of almonds, coconut, and chocolate, in various forms, combined with a creamy filling proved irresistible.
Then in a surge of reorganization, I filed my notes SOMEWHERE !
Does that ever happen to you??
You develop a new system and reason to organize and then you can’t find something!
Human I guess. But I digress!
One of my CTE students, Claire, kept requesting that I make them again!
Always wanting to take care of my students’ wishes
I was forced to figure out where or how I had filed my notes!
After some false starts, I did!
UNDER BLOGS-
Which made sense since I had wanted to share them EVENTUALLY! 🙂
Finding my notes was crucial because as a teacher and baker, when I had prepared the confections,
I had converted the volumes listed in the original recipe to weights using OXO digital scale and my standardized measuring spoons.
WHY YOU MAY ASK?
I want everyone to be able to reproduce my results-which proved to be very successful as the repeated requests indicate!
AND
As a professional baker, you know that volume measurements are not dependable!
One person’s cup may not be another!
AND let’s say that you wanted to price them
How to price “a cup of whatever.” 😊
I WANTED TO MAKE EVERYTHING FROM SCRATCH AS WELL.
I did not want to use boxed vanilla pudding mix as a substitute for the
“vanilla custard powder” common in Canada but not here in Los Angeles.
I did search online for a handmade version to adapt.
I converted the volumes and modified the vanilla source
using vanilla bean paste instead of a scraped vanilla bean.
(One vanilla bean may be fatter and juicier than another!)
Vanilla bean paste is so easy to use and a dependable unit when measured.
I use Taylor and Colledge Organic Vanilla Bean Paste with Seeds.
THE RESULT: A YIELD OF 64 one-inch delectable Nanaimo Bars-
ENJOY!
Let’s Begin:
Equipment used and special ingredients:
- 8×8 inch magic line cake pan (prefer straight sides but used a glass Pyrex which has curved corners—as I am not entering a baking contest😊)
- portable mixer with beaters,
- saucepan,
- stainless steel bowls for Baine Marie (double boiler setup),
- small whisk,
- digital scale,
- standardized measuring spoons
- rubber scraper,
- bowl scraper,
- parchment or waxed paper,
- Scissors
- food processor,
- ½ sheet pan to toast almonds-but you may want to buy them toasted already),
- small offset spatula,
- bowls to combine ingredients,
- custard cup for cracking egg, AND
- Crisco shortening to adhere parchment paper to sides of baking pan,
- cutting board,
- knife for cutting up the bar after refrigeration
- a stove burner for heating the knife before cutting the cold dessert.
I HOPE that I have not forgotten anything!
Let us begin the mise en place for the recipe (my formula)
MAKE FIRST:
Chef Susan’s Handmade Vanilla Pudding Mix
Superfine granulated sugar 7 ounces
Low fat dry milk powder .75 ounces
Cornstarch 1 ounce
Vanilla Bean Paste 1 ½ teaspoon
Salt 1 teaspoon
Combine all the ingredients in a bowl using a small rubber scraper, smashing all together until a homogenous mixture is formed. Set aside.

Freeze left over in an airtight covered container for future Nanaimo Bars-you will be asked to make them again.
Formula can be halved successfully.
Mixture can be frozen for 4 months for sure and I am surmising for 6 months if the container is airtight.
So, if you wanted to make this ahead and freeze, you could.
PREPARE PAN NEXT:
- Rub shortening onto 8×8 inch baking pan-be sure to cover sides and bottom thoroughly with a thin film.
- Cut parchment paper or waxed paper to fit the bottom and sides of the pan in both directions.
- If the pan has curved corners as mine does, insert a small piece of chosen paper under the other paper, in each corner, to cover the exposed pan.

I NOW MEASURE ALL THE INGREDIENTS OF EACH LAYER BEFORE I BEGIN PUTTING THIS DELECTABLE CONFECTION TOGETHER.
I must control my impulses not to just get started one layer at a time and then measure….
But really… doing all of that before saves you time and mistakes……AND
You have more control of the temperature of each layer because
you are not going from measuring TO mixing BACK AND FORTH.
PLEASE TRUST ME!
I use the processor to finely grind Graham Crackers and the almonds (separately).

Bottom Layer:
Unsalted Butter 4 ounces
Salt ¼ teaspoon
Superfine Sugar 1.5 ounces
Cocoa powder 1.0 ounce
Egg, beaten well 1.75 ounces
Graham Cracker Crumbs 3.75 ounces
Almonds, slivered, toasted, finely chopped 2.25 ounces
Coconut, flaked 3 ounces

Middle Layer:
Unsalted butter, soft (70 degrees Fahrenheit) 4 ounces
Heavy cream 1.5 ounces
Chef’s Handmade Vanilla Pudding Mix .5 ounce
Confectioner’s Sugar 5.75 ounces
Top Layer:
Semi-sweet Belgian Chocolate 6 ounces
Unsalted butter 1.5 ounces
Now that all of the ingredients have been measured— and to be honest…
PUTTING ALL THE LAYERS TOGETHER-FINALLY!
Procedure for Bottom Layer:
- In a large mixing bowl, combine Graham cracker crumbs, coconut, and chopped almonds
- Melt butter, sugar, salt, and cocoa in the bowl of the Baine Marie.
- When above is all melted and combined, add beaten egg with a whisk into the bowl and cook briefly and whisk quickly and the mixture will thicken.
- Remove the butter mixture from the heat and combine them with the Graham cracker mixture using a rubber scraper and folding and pressing all the ingredients together until homogenous.


5. Distribute the mixture over the bottom of the pan and then press firmly making sure that the mixture has an even thickness over the entire bottom surface. I use the straight edged of the bowl scraper to even mixture at the edges.

 (Bowl scraper used to even mixture)
6. Refrigerate until ready to top with the middle cream layer which you make next.
 (Finished bottom layer)
Procedure for Middle Layer
- Using the portable hand mixer (because the amount of ingredients for this is small) and a rubber scraper, combine all the ingredients with the beaters, slowly at first, and beat at medium speed until light and fluffy.

 (Light and fluffy)
2. With a bowl scraper, scrape and pile all the fluffy mixture onto the bottom layer and with a small offset spatula, spread the fluff evenly over the bottom layer. (Avoid going back and forth with the spatula, rather turn the pan and spread in one direction to avoid picking up an of the bottom mixture.

3. Refrigerate while you make the top layer.
 (middle and bottom later ready for chilling)
Procedure for Top Layer
- Melt the butter and the chocolate together until almost completely melted. Take off the heat and continue stirring with a rubber scraper until all the chocolate and butter are melted and evenly combined.

2. I avoid overheating the chocolate mixture and want a texture like a soft ganache-a bit more runny than peanut butter.
3. When butter and chocolate are well combined, scrape all onto the chilled middle layer as quickly as possible and spread with a small offset spatula avoiding back and forth motion to keep the creamy middle layer mixing with the chocolate!

4. Refrigerate for at least 3-4 hours, or until firm.
5. If you are not eating right away, cover with saran after about an hour and keep refrigerated until served.
6. Cool for a few minutes and put the pan into the refrigerator.
Presentation/Serving Suggestions:
- When ready to cut into serving portions, lift the entire three-layer slab out of the pan using the paper to help you.
- There should be no resistance because of the paper lining the pan.
- Remove the paper from the bottom of the slab.
- Measure by scoring with a knife
- Once satisfied with the scoring, heat the knife and mark the pieces piercing the chocolate layer but not through any other.
- This will prevent the chocolate from breaking off when you cut through all layers.
- Once this is done and with a clean knife, cut through all layers into desired pieces.
- My yield: 64 pieces as my marks were at one-inch intervals in both directions.


Serving Notes:
I prefer serving these bars cold as they are neater to eat but they are delicious at room temperature and will disappear at whatever temperature they are served.
A suggestion for a dessert buffet would be to place each bar into a paper candy cup—like chocolate candies are served.
The post NANAIMO BARS-The Most Requested Confection! appeared first on Baking and Cake Art Academy.
#NANAIMO #BARSThe #Requested #Confection